

Wiring A Push Button

Wiring a push button can be a useful skill especially if you have just had a button stop working on you. In this post, we will discuss the different ways that you can wire a push button so that you can send the desired effect to your arcade board.
Wiring A Push Button
 Ad")
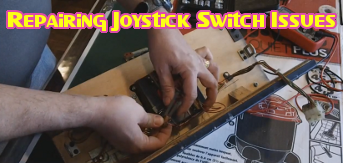
While push buttons may work on a simple concept, there is actually a lot more to them than you might think. A push button is made up of 2 plastic molded pieces: an inner part and an outer part. The inner part is the part that you push down when you hit the button and the outer part is the bezel that goes around the inner part of the button. The inner part is held up by a spring and clips into the outer part via two plastic clips. When you push down on the inner part of the button, one of the plastic clips comes in contact with a microswitch (sometimes called a Cherry switch for the brand) which in turn sends a signal to the game to perform an operation.
Even though microswitches usually have three metal prongs on them, you usually only wire up two. The most common wiring setup for a microswitch is to have the ground wire on the very bottom prong (the common prong) and the action wire on the prong closest to the ground wire (the normally open prong). This will send a signal to the board whenever the button is pressed. This setup is used in the majority of arcade games that you will encounter.
You can also wire a push button where a signal is constantly sent to the board until you push the button at which point it will cease. To do this, place the ground wire once again on the bottom prong (the common prong) but now put the action wire on the prong furthest from the ground wire (the normally closed prong). This is handy when you want the button to perform an action when you let go of the button.
")
Cherry Switch Wiring (courtesy of therealbobroberts.net)
Since push buttons tend to wear out over time, knowing how to wire a push button will come in handy when you need to replace one in the future. Please feel free to make leave any questions or suggestions in the comments below.


We received a question on YouTube about the best way to connect the wires to the actual microswitch prongs?
We use the Quick Disconnect Terminals as they allow you to easily replace a microswitch should it go out without resoldering. You can order them from http://www.therealbobroberts.net/qd-id.html. We recommend the 5, 6 or 7 depending on the size of the prongs on your microswitch.